我的学习笔记

土猛的员外

创建一个可以将图纸生成网站的AI应用

img

很有可能,你已经遇到了来自各种第三方AI公司的声明,他们介绍了他们的工具能够将任何绘图或图像转换为功能齐全的网站。乍一看,这个功能似乎对那些可能对AI能力的进步表示钦佩的人很有吸引力。然而,随着我们深入探索llm驱动的应用程序领域,我们应该知道,利用现有的AI技术实现这些功能并不需要太多的努力。

将图纸转换为网站的应用不仅令人着迷,而且非常实用。它为设计师和开发人员开辟了令人兴奋的可能性,使他们能够快速将创意转化为功能网页。当然,要使整个网站具有草图上的所有功能,像这样的应用程序的一次性生成可能会很困难,因为您必须与语言模型进行来回对话以完善细节。然而,即使是一个简单的网站演示,反映你的画只是非常方便,在网上分享想法,制作小工具,并在舞台上现场演示。

跟着我来创建应用程序吧!

1. 设计概述

Drawing2Website的开发将由图像识别和LLM两个促成因素催化。图像认知有很多选择,在这个项目中,我使用微软Azure计算机视觉服务来完成这个任务。至于LLM,毫无疑问,我将继续调用带有GPT模型的Langchain方法来完成源代码生成任务。

使用Streamlit进行web框架设计,演示应用程序的性能与在线服务相比相当有竞争力。让我们来看看。

a) 用户体验

让我们来看看这个演示应用程序的UI,让您了解一下它的视觉效果。请注意,这就像我对大多数llm驱动的应用程序所做的那样,这些应用程序没有太复杂的用户体验。专注于关键功能的实现,用户体验总是直接设计,并将进一步的扩展留给开发人员。

登陆页面

img

一个简单的登陆页面显示了一个文本输入栏,您可以在其中粘贴绘图图片的URL。如果你没有,你必须绘制一个布局并将其上传到像ibb.co这样的图像存储服务,或者你可以直接使用我的。按“运行”键使发动机启动。

Website生成

img

当认知和生成任务完成后,将同时显示原始绘图图片和生成的网站UI,并显示包含HTML源代码的扩展栏。

b) 框图

让我们来研究一下这个应用程序的框图,以便更清楚地了解信息流和操作是如何执行的。别担心,这个图表很简单,很容易理解。

img

Block Diagram

首先将绘图图像上传到Azure Computer Vision服务中,获取基于文本的认知结果。我们的应用程序提取已识别的文本块及其坐标。然后将这些元素集成到Langchainprompt模板工具中,该工具使用GPT-3.5或GPT-4模型与LLMChain通信,以生成HTML/CSS源代码。最后,Streamlit Components小部件用于将源代码转换为iFrame内的功能HTML网站。

2. 代码走查

现在,让我们一步一步地探索将这个Drawing2Website带入生活的代码工作流。

a) Azure计算机视觉

Azure计算机视觉是一种基于云的认知服务,为开发人员提供了处理和分析视觉数据的高级算法。它是微软Azure认知服务的一部分,该服务允许开发人员将视觉、语音、语言、搜索和知识等AI功能轻松整合到他们的应用程序中。计算机视觉的主要特性包括图像分类、对象检测、光学字符识别、人脸检测、条形码扫描、图像调节等。

img

在这个项目中,我们将使用OCR(光学字符识别)服务进行文本识别,而不需要任何预训练。

首先,你必须在Azure帐户中订阅计算机视觉服务。假设您已经有了一个帐户,您应该访问服务的门户来创建订阅。单击Create按钮创建一个,并按照下一页中的流程完成订阅。请记住,对于可用带宽有限的演示应用程序,您可以选择F0作为免费价格层。

img

一旦你完成了你的订阅,就会有一个工作的服务在列表中,像我的“yeyulab-vision”,点击详细页面上的名称。除了可以在概述页面上找到的端点和密钥之外,您不应该再关注其他细节。把它们复制到安全的地方,稍后再开发。

img

端点和密钥

要在Python中实现视觉认知功能,首先,您应该pip安装这些包。

1
2
!pip install --upgrade azure-cognitiveservices-vision-computervision
!pip install pillow

导入我们稍后将使用的所有模块。

1
2
3
4
5
6
7
8
from azure.cognitiveservices.vision.computervision import ComputerVisionClient
from azure.cognitiveservices.vision.computervision.models import OperationStatusCodes
from azure.cognitiveservices.vision.computervision.models import VisualFeatureTypes
from msrest.authentication import CognitiveServicesCredentials

from array import array
import os
from PIL import Image

加载我们在创建订阅时复制的端点和密钥。然后在此基础上创建计算机视觉客户端。

1
2
3
subscription_key = "Your Key"
endpoint = "Your endpoint"
computervision_client = ComputerVisionClient(endpoint, CognitiveServicesCredentials(subscription_key))

现在我们要定义一个识别在线图像的方法。

1
2
3
4
5
6
7
8
9
10
11
12
13
14
15
16
17
18
19
20
21
22
def text_recognition(img_url):

print("===== Read File - remote =====")
read_response = computervision_client.read(img_url, raw=True)
read_operation_location = read_response.headers["Operation-Location"]
operation_id = read_operation_location.split("/")[-1]

# Call the "GET" API and wait for it to retrieve the results
while True:
read_result = computervision_client.get_read_result(operation_id)
if read_result.status not in ['notStarted', 'running']:
break
time.sleep(1)

layout = []
if read_result.status == OperationStatusCodes.succeeded:
for text_result in read_result.analyze_result.read_results:
for line in text_result.lines:
layout.append({line.text:line.bounding_box})
print(layout)
print("End of Computer Vision.")
return layout
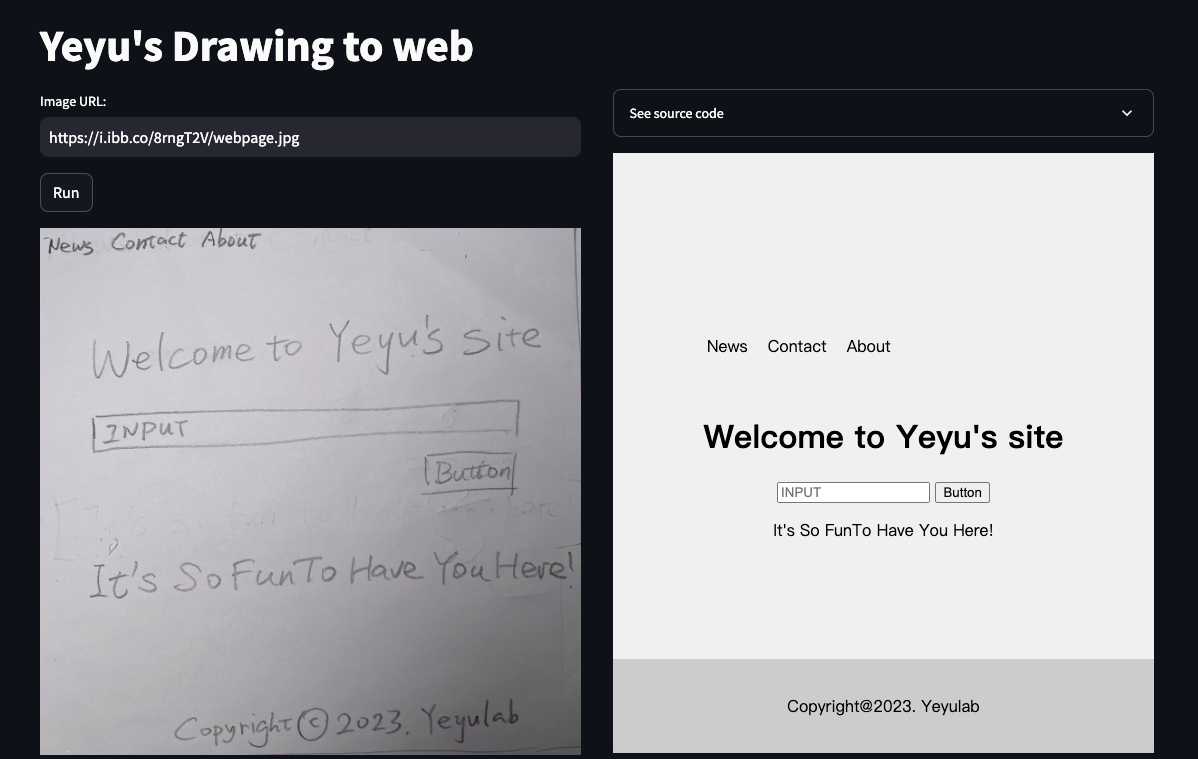
这是从文本图像中识别每一行的标准过程,它们的协调称为bounding_box,它表示一个文本块的四个外部顶点。最后一步是返回结构中的布局字典:

1
2
3
4
5
6
[{'News Contact About': [11.0, 32.0, 979.0, 7.0, 982.0, 97.0, 13.0, 123.0]}, 
{'Welcome to Yeyu's site': [216.0, 483.0, 2210.0, 373.0, 2222.0, 558.0, 227.0, 675.0]},
{'INPUT': [262.0, 847.0, 658.0, 824.0, 664.0, 938.0, 264.0, 958.0]},
{'Button': [1713.0, 1021.0, 2084.0, 1011.0, 2089.0, 1127.0, 1713.0, 1140.0]},
{'It's So FunTo Have You Here!': [217.0, 1463.0, 2348.0, 1420.0, 2350.0, 1585.0, 222.0, 1651.0]},
{'Copyright@2023. Yeyulab': [586.0, 2146.0, 2123.0, 2069.0, 2129.0, 2224.0, 591.0, 2297.0]}]

b) Langchain LLMChain

在本项目中,我们只使用基于Langchain的LLMChain来处理prompt模板,该模板将使用文本认知结果的输出来构建,以prompt语言模型。

通常我们首先应该做的是安装langchain。

1
!pip install langchain openai

导入模块并设置OpenAI API Key。

1
2
3
4
5
6
from langchain.prompts import PromptTemplate
from langchain.chat_models import ChatOpenAI
from langchain.chains import LLMChain
import os

os.environ["OPENAI_API_KEY"] = "Your API Key"

然后定义一个方法’ html_gen(layout) ‘,从输入的图像认知文本生成HTML源代码。

1
2
3
4
5
6
7
8
9
10
11
12
13
14
15
16
17
18
19
20
def html_gen(layout):
prompt = PromptTemplate(
template="""This is a layout of a handwriting website design, including text and their coordinates of four outer vertices.
Make an HTML modern sans-serif website that reflects these elements and decide which
CSS can be used to match their relative positions, try to use proper layout tags to match
their font size and relative placement based on their coordinates.
Use <ul> and <li> if the elements look like as menu list.
Smartly use function tags like <button> <input> if their names look like that.
Your design should be prior to the coordinates,
then you should also use some imagination for the layout and CSS from common web design principle.
Remember, don't use absolute coordinates in your HTML source code.
Generate only source code file, no description: {layout}.\n""",
input_variables=["layout"]
)
llm = ChatOpenAI(model="gpt-4-0613",temperature=0)
chain = LLMChain(prompt=prompt, llm=llm)
output = chain.run(layout=layout)
print(output)

return output

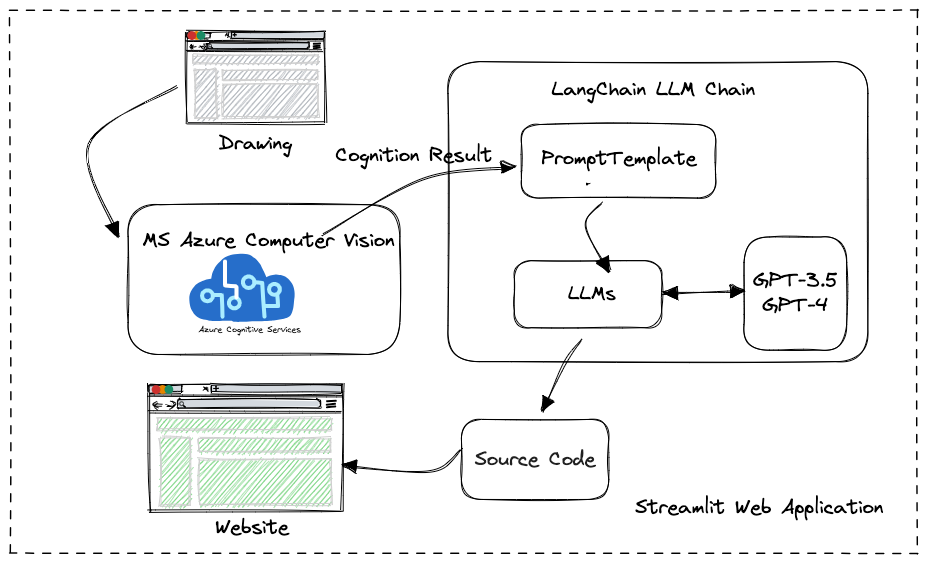
最关键的部分是prompt模板,其中包含许多关于每个元素的文本位置的说明,并强调样式。

c) Streamlit

作为最后一步,我们应该使用Streamlit和它的小部件将所有这些功能包装成一个流畅的用户交互。

让我们先安装Streamlit。

1
!pip install streamlit

导入Streamlit包和组件类。

1
2
import streamlit as st
import streamlit.components.v1 as components

定义两个session_state (HTML和image)来缓存生成的HTML源代码文本和图像URL文本。

1
2
3
4
if "html" not in st.session_state:
st.session_state.html = ""
if "image" not in st.session_state:
st.session_state.image = ''

现在我们创建一个回调函数来触发图像认知和HTML生成。

1
2
3
4
5
6
7
8
def image_run():
html_code = ""
layout = text_recognition(st.session_state.img)
if layout != []:
html_code = html_gen(layout)

st.session_state.html = html_code
st.session_state.image = st.session_state.img

最后创建所有必要的UI小部件,包括标题、列、用于图像URL的文本输入、用于提交的按钮、用于图像显示的图像、用于源代码容器的扩展器以及用于处理HTML框架的组件API。

1
2
3
4
5
6
7
8
9
10
11
12
st.title("Yeyu's Drawing to web")
col1, col2 = st.columns([0.5, 0.5], gap='medium')
with col1:
st.text_input("Image URL:", value="", key='img')
st.button("Run", on_click=image_run)
if st.session_state.image != '':
st.image(st.session_state.image)
with col2:
with st.expander("See source code"):
st.code(st.session_state.html)
with st.container():
components.html(st.session_state.html, height=600, scrolling=True)

将以上所有代码打包到一个文件” drawing2web.py “中,然后在终端上运行命令:

1
!python -m streamlit run drawing2web.py

如果运行成功,将打印外部用户可以访问的带有默认端口的URL:

1
2
3
You can now view your Streamlit app in your browser.
Network URL: http://xxx.xxx.xxx.xxx:8501
External URL: http://xxx.xxx.xxx.xxx:8501

您的Drawing2Website生成器现在已经准备好并能够执行其任务。

原文:Create an AI Application That Transforming Your Drawing into a Website


我们的创业项目已经上线!!!

TorchV AI,帮助企业快速进入AI时代!

具体详情,请点击官网咨询


最新内容,关注“土猛的员外”公众号